
A Hacker’s Guide to Git is now available as an e-book. You can purchase it on Leanpub.
- Introduction
- Repositories
- Tree Objects
- Commits
- References
- Branches
- Tags
- Merging
- Rebasing
- Cherry-Picking
- Rebasing (Continued)
- Remotes
- Toolkit
- Useful commands
Introduction
Git is currently the most widely used version control system in the world, mostly thanks to GitHub. By that measure, I’d argue that it’s also the most misunderstood version control system in the world.
This statement probably doesn’t ring true straight away because on the surface, Git is pretty simple. It’s really easy to pick up if you’ve come from another VCS like Subversion or Mercurial. It’s even relatively easy to pick up if you’ve never used a VCS before. Everybody understands adding, committing, pushing and pulling; but this is about as far as Git’s simplicity goes. Past this point, Git is shrouded by fear, uncertainty and doubt.
Once you start talking about branching, merging, rebasing, multiple remotes, remote-tracking branches, detached HEAD states… Git becomes less of an easily-understood tool and more of a feared deity. Anybody who talks about no-fast-forward merges is regarded with quiet superstition, and even veteran hackers would rather stay away from rebasing “just to be safe”.
I think a big part of this is due to many people coming to Git from a conceptually simpler VCS – probably Subversion – and trying to apply their past knowledge to Git. It’s easy to understand why people want to do this. Subversion is simple, right? It’s just files and folders. Commits are numbered sequentially. Even branching and tagging is simple – it’s just like taking a backup of a folder.
Basically, Subversion fits in nicely with our existing computing paradigms. Everybody understands files and folders. Everybody knows that revision #10 was the one after #9 and before #11. But these paradigms break down when you try to apply them to Git.
That’s why trying to understand Git in this way is wrong. Git doesn’t work like Subversion at all. Which can be pretty confusing. You can add and remove files. You can commit your changes. You can generate diffs and patches which look just like the ones that Subversion generates. So how can something which appears so similar really be so different?
Complex systems like Git become much easier to understand once you figure out how they really work. The goal of this guide is to shed some light on how Git works under the hood. We’re going to take a look at some of Git’s core concepts including its basic object storage, how commits work, how branches and tags work, and we’ll look at the different kinds of merging in Git including the much-feared rebase. Hopefully at the end of it all, you’ll have a solid understanding of these concepts and will be able to use some of Git’s more advanced features with confidence.
It’s worth noting at this point that this guide is not intended to be a beginner’s introduction to Git. This guide was written for people who already use Git, but would like to better understand it by taking a peek under the hood, and learn a few neat tricks along the way. With that said, let’s begin.
Repositories
At the core of Git, like other VCS, is the repository. A Git repository is really just a simple key-value data store. This is where Git stores, among other things:
- Blobs, which are the most basic data type in Git. Essentially, a blob is just a bunch of bytes; usually a binary representation of a file.
- Tree objects, which are a bit like directories. Tree objects can contain pointers to blobs and other tree objects.
- Commit objects, which point to a single tree object, and contain some metadata including the commit author and any parent commits.
- Tag objects, which point to a single commit object, and contain some metadata.
- References, which are pointers to a single object (usually a commit or tag object).
You don’t need to worry about all of this just yet; we’ll cover these things in more detail later.
The important thing to remember about a Git repository is that it exists entirely in a single .git directory in your project root. There is no central repository like in Subversion or CVS. This is what allows Git to be a distributed version control system – everybody has their own self-contained version of a repository.
You can initialize a Git repository anywhere with the git init command. Take a look inside the .git folder to get a glimpse of what a repository looks like.
$ git init
Initialized empty Git repository in /home/demo/demo-repository/.git/
$ ls -l .git
total 32
drwxrwxr-x 2 demo demo 4096 May 24 20:10 branches
-rw-rw-r-- 1 demo demo 92 May 24 20:10 config
-rw-rw-r-- 1 demo demo 73 May 24 20:10 description
-rw-rw-r-- 1 demo demo 23 May 24 20:10 HEAD
drwxrwxr-x 2 demo demo 4096 May 24 20:10 hooks
drwxrwxr-x 2 demo demo 4096 May 24 20:10 info
drwxrwxr-x 4 demo demo 4096 May 24 20:10 objects
drwxrwxr-x 4 demo demo 4096 May 24 20:10 refs
The important directories are .git/objects, where Git stores all of its objects; and .git/refs, where Git stores all of its references.
We’ll see how all of this fits together as we learn about the rest of Git. For now, let’s learn a little bit more about tree objects.
Tree Objects
A tree object in Git can be thought of as a directory. It contains a list of blobs (files) and other tree objects (sub-directories).
Imagine we had a simple repository, with a README file and a src/ directory containing a hello.c file.
README
src/
    hello.c
This would be represented by two tree objects: one for the root directory, and another for the src/ directory. Here’s what they would look like.
tree 4da454..
| blob | 976165.. | README |
| tree | 81fc8b.. | src |
tree 81fc8b..
| blob | 1febef.. | hello.c |
If we draw the blobs (in green) as well as the tree objects (in blue), we end up with a diagram that looks a lot like our directory structure.
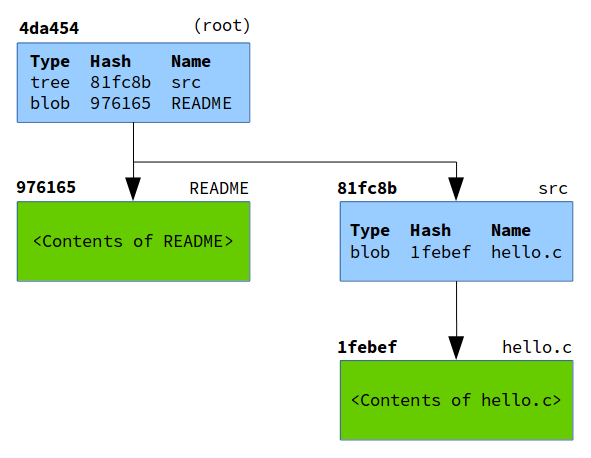
Notice how given the root tree object, we can recurse through every tree object to figure out the state of the entire working tree. The root tree object, therefore, is essentially a snapshot of your repository at a given time. Usually when Git refers to “the tree”, it is referring to the root tree object.
Now let’s learn how you can track the history of your repository with commit objects.
Commits
A commit object is essentially a pointer that contains a few pieces of important metadata. The commit itself has a hash, which is built from a combination of the metadata that it contains:
- The hash of the tree (the root tree object) at the time of the commit. As we learned in Tree Objects, this means that with a single commit, Git can build the entire working tree by recursing into the tree.
- The hash of any parent commits. This is what gives a repository its history: every commit has a parent commit, all the way back to the very first commit.
- The author’s name and email address, and the time that the changes were authored.
- The committer’s name and email address, and the time that the commit was made.
- The commit message.
Let’s see a commit object in action by creating a simple repository.
 $ git init
Initialized empty Git repository in /home/demo/simple-repository/.git/
 $ echo 'This is the readme.' > README
 $ git add README
 $ git commit -m "First commit"
[master (root-commit) d409ca7] First commit
 1 file changed, 1 insertion(+)
 create mode 100644 README
When you create a commit, Git will give you the hash of that commit. Using git show with the --format=raw flag, we can see this newly-created commit’s metadata.
$ git show --format=raw d409ca7

commit d409ca76bc919d9ca797f39ae724b7c65700fd27
tree 9d073fcdfaf07a39631ef94bcb3b8268bc2106b1
author Joseph Wynn <joseph@wildlyinaccurate.com> 1400976134 -0400
committer Joseph Wynn <joseph@wildlyinaccurate.com> 1400976134 -0400

    First commit

diff --git a/README b/README
new file mode 100644
index 0000000..9761654
--- /dev/null
+++ b/README
@@ -0,0 +1 @@
+This is the readme.
Notice how although we referenced the commit by the partial hash d409ca7, Git was able to figure out that we actually meant d409ca76bc919d9ca797f39ae724b7c65700fd27. This is because the hashes that Git assigns to objects are unique enough to be identified by the first few characters. You can see here that Git is able to find this commit with as few as four characters; after which point Git will tell you that the reference is ambiguous.
$ git show d409c
$ git show d409
$ git show d40
fatal: ambiguous argument 'd40': unknown revision or path not in the working tree.
References
In previous sections, we saw how objects in Git are identified by a hash. Since we want to manipulate objects quite often in Git, it’s important to know their hashes. You could run all your Git commands referencing each object’s hash, like git show d409ca7, but that would require you to remember the hash of every object you want to manipulate.
To save you from having to memorize these hashes, Git has references, or “refs”. A reference is simply a file stored somewhere in .git/refs, containing the hash of a commit object.
To carry on the example from Commits, let’s figure out the hash of “First commit” using references only.
$ git status
On branch master
nothing to commit, working directory clean
git status has told us that we are on branch master. As we will learn in a later section, branches are just references. We can see this by looking in .git/refs/heads.
$ ls -l .git/refs/heads/
total 4
-rw-rw-r-- 1 demo demo 41 May 24 20:02 master
We can easily see which commit master points to by reading the file.
$ cat .git/refs/heads/master
d409ca76bc919d9ca797f39ae724b7c65700fd27
Sure enough, master contains the hash of the “First commit” object.
Of course, it’s possible to simplify this process. Git can tell us which commit a reference is pointing to with the show and rev-parse commands.
$ git show --oneline master
d409ca7 First commit
$ git rev-parse master
d409ca76bc919d9ca797f39ae724b7c65700fd27
Git also has a special reference, HEAD. This is a “symbolic” reference which points to the tip of the current branch rather than an actual commit. If we inspect HEAD, we see that it simply points to refs/head/master.
$ cat .git/HEAD
ref: refs/heads/master
It is actually possible for HEAD to point directly to a commit object. When this happens, Git will tell you that you are in a “detached HEAD state”. We’ll talk a bit more about this later, but really all this means is that you’re not currently on a branch.
Branches
Git’s branches are often touted as being one of its strongest features. This is because branches in Git are very lightweight, compared to other VCS where a branch is usually a clone of the entire repository.
The reason branches are so lightweight in Git is because they’re just references. We saw in References that the master branch was simply a file inside .git/refs/heads. Let’s create another branch to see what happens under the hood.
$ git branch test-branch
$ cat .git/refs/heads/test-branch
d409ca76bc919d9ca797f39ae724b7c65700fd27
It’s as simple as that. Git has created a new entry in .git/refs/heads and pointed it at the current commit.
We also saw in References that HEAD is Git’s reference to the current branch. Let’s see that in action by switching to our newly-created branch.
$ cat .git/HEAD
ref: refs/heads/master
$ git checkout test-branch
Switched to branch 'test-branch'
$ cat .git/HEAD
ref: refs/heads/test-branch
When you create a new commit, Git simply changes the current branch to point to the newly-created commit object.
$ echo 'Some more information here.' >> README
$ git add README
$ git commit -m "Update README in a new branch"
[test-branch 7604067] Update README in a new branch
 1 file changed, 1 insertion(+)
$ cat .git/refs/heads/test-branch
76040677d717fd090e327681064ac6af9f0083fb
Later on we’ll look at the difference between local branches and remote-tracking branches.
Before we look at how tags work, let’s switch back to the master branch.
$ git checkout master
Switched to branch 'master'
Tags
There are two types of tags in Git – lightweight tags and annotated tags.
On the surface, these two types of tags look very similar. Both of them are references stored in .git/refs/tags. However, that’s about as far as the similarities go. Let’s create a lightweight tag to see how they work.
$ git tag 1.0-lightweight
$ cat .git/refs/tags/1.0-lightweight
d409ca76bc919d9ca797f39ae724b7c65700fd27
We can see that Git has created a tag reference which points to the current commit. By default, git tag will create a lightweight tag. Note that this is not a tag object. We can verify this by using git cat-file to inspect the tag.
$ git cat-file -p 1.0-lightweight
tree 9d073fcdfaf07a39631ef94bcb3b8268bc2106b1
author Joseph Wynn <joseph@wildlyinaccurate.com> 1400976134 -0400
committer Joseph Wynn <joseph@wildlyinaccurate.com> 1400976134 -0400

First commit
$ git cat-file -p d409ca7
tree 9d073fcdfaf07a39631ef94bcb3b8268bc2106b1
author Joseph Wynn <joseph@wildlyinaccurate.com> 1400976134 -0400
committer Joseph Wynn <joseph@wildlyinaccurate.com> 1400976134 -0400

First commit
You can see that as far as Git is concerned, the 1.0-lightweight tag and the d409ca7 commit are the same object. That’s because the lightweight tag is only a reference to the commit object.
Let’s compare this to an annotated tag.
$ git tag -a -m "Tagged 1.0" 1.0
$ cat .git/refs/tags/1.0
10589beae63c6e111e99a0cd631c28479e2d11bf
We’ve passed the -a (--annotate) flag to git tag to create an annotated tag. Notice how Git creates a reference for the tag just like the lightweight tag, but this reference is not pointing to the same object as the lightweight tag. Let’s use git cat-file again to inspect the object.
$ git cat-file -p 1.0
object d409ca76bc919d9ca797f39ae724b7c65700fd27
type commit
tag 1.0
tagger Joseph Wynn <joseph@wildlyinaccurate.com> 1401029229 -0400

Tagged 1.0
This is a tag object, separate to the commit that it points to. As well as containing a pointer to a commit, tag objects also store a tag message and information about the tagger. Tag objects can also be signed with a GPG key to prevent commit or email spoofing.
Aside from being GPG-signable, there are a few reasons why annotated tags are preferred over lightweight tags.
Probably the most important reason is that annotated tags have their own author information. This can be helpful when you want to know who created the tag, rather than who created the commit that the tag is referring to.
Annotated tags are also timestamped. Since new versions are usually tagged right before they are released, an annotated tag can tell you when a version was released rather than just when the final commit was made.
Merging
Merging in Git is the process of joining two histories (usually branches) together. Let’s start with a simple example. Say you’ve created a new feature branch from master, and done some work on it.
$ git checkout -b feature-branch
Switched to a new branch 'feature-branch'
$ vim feature.html
$ git commit -am "Finished the new feature"
[feature-branch 0c21359] Finished the new feature
 1 file changed, 1 insertion(+)
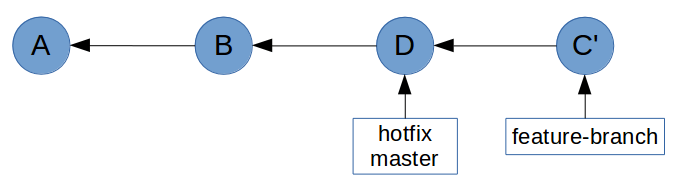
At the same time, you need to fix an urgent bug. So you create a hotfix branch from master, and do some work in there.
$ git checkout master
Switched to branch 'master'
$ git checkout -b hotfix
Switched to a new branch 'hotfix'
$ vim index.html
$ git commit -am "Fixed some wording"
[hotfix 40837f1] Fixed some wording
 1 file changed, 1 insertion(+), 1 deletion(-)
At this point, the history will look something like this.
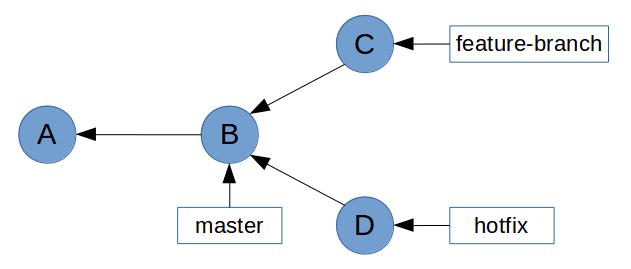
Now you want to bring the bug fix into master so that you can tag it and release it.
$ git checkout master
Switched to branch 'master'
$ git merge hotfix
Updating d939a3a..40837f1
Fast-forward
 index.html | 2 +-
 1 file changed, 1 insertion(+), 1 deletion(-)
Notice how Git mentions fast-forward during the merge. What this means is that all of the commits in hotfix were directly upstream from master. This allows Git to simply move the master pointer up the tree to hotfix. What you end up with looks like this.
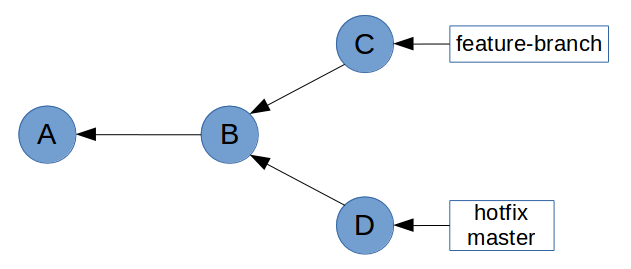
Now let’s try and merge feature-branch into master.
$ git merge feature-branch
Merge made by the 'recursive' strategy.
 feature.html | 1 +
 1 file changed, 1 insertion(+)
This time, Git wasn’t able to perform a fast-forward. This is because feature-branch isn’t directly upstream from master. This is clear on the graph above, where master is at commit D which is in a different history tree to feature-branch at commit C.
So how did Git handle this merge? Taking a look at the log, we see that Git has actually created a new ”merge” commit, as well as bringing the commit from feature-branch.
$ git log --oneline
8ad0923 Merge branch 'feature-branch'
0c21359 Finished the new feature
40837f1 Fixed some wording
d939a3a Initial commit
Upon closer inspection, we can see that this is a special kind of commit object – it has two parent commits. This is referred to as a merge commit.
$ git show --format=raw 8ad0923

commit 8ad09238b0dff99e8a99c84d68161ebeebbfc714
tree e5ee97c8f9a4173f07aa4c46cb7f26b7a9ff7a17
parent 40837f14b8122ac6b37c0919743b1fd429b3bbab
parent 0c21359730915c7888c6144aa8e9063345330f1f
author Joseph Wynn <joseph@wildlyinaccurate.com> 1401134489 +0100
committer Joseph Wynn <joseph@wildlyinaccurate.com> 1401134489 +0100

 Merge branch 'feature-branch'
This means that our history graph now looks something like this (commit E is the new merge commit).

Some people believe that this sort of history graph is undesirable. In the Rebasing (Continued) section, we’ll learn how to prevent non-fast-forward merges by rebasing feature branches before merging them with master.
Rebasing
Rebasing is without a doubt one of Git’s most misunderstood features. For most people, git rebase is a command that should be avoided at all costs. This is probably due to the extraordinary amount of scaremongering around rebasing. “Rebase Considered Harmful”, and “Please, stay away from rebase” are just two of the many anti-rebase articles you will find in the vast archives of the Internet.
But rebase isn’t scary, or dangerous, so long as you understand what it does. But before we get into rebasing, I’m going to take a quick digression, because it’s actually much easier to explain rebasing in the context of cherry-picking.
Cherry-Picking
What git cherry-pick does is take one or more commits, and replay them on top of the current commit. Imagine a repository with the following history graph.
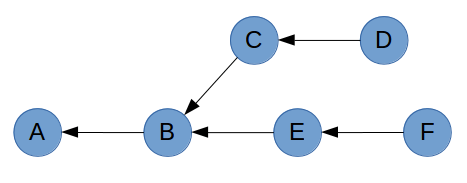
If you are on commit D and you run git cherry-pick F, Git will take the changes that were introduced in commit F and replay them as a new commit (shown as F’) on top of commit D.
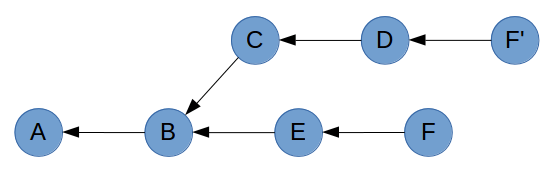
The reason you end up with a copy of commit F rather than commit F itself is due to the way commits are constructed. Recall that the parent commit is part of a commit’s hash. So despite containing the exact same changes, author information and timestamp; F’ will have a different parent to F, giving it a different hash.
A common workflow in Git is to develop features on small branches, and merge the features one at a time into the master branch. Let’s recreate this scenario by adding some branch labels to the graphs.
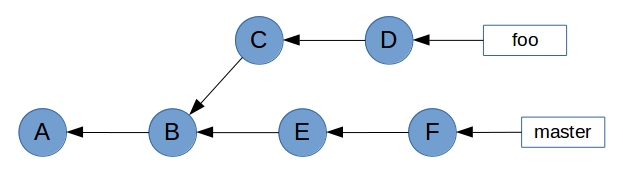
As you can see, master has been updated since foo was created. To avoid potential conflicts when foo is merged with master, we want to bring master’s changes into foo. Because master is the base branch, we want to play foo’s commits on top of master. Essentially, we want to change commit C’s parent from B to F.
It’s not going to be easy, but we can achieve this with git cherry-pick. First, we need to create a temporary branch at commit F.
$ git checkout master
$ git checkout -b foo-tmp
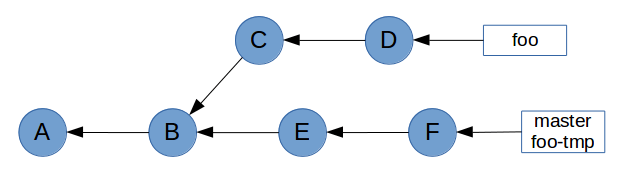
Now that we have a base on commit F, we can cherry-pick all of foo’s commits on top of it.
$ git cherry-pick C D
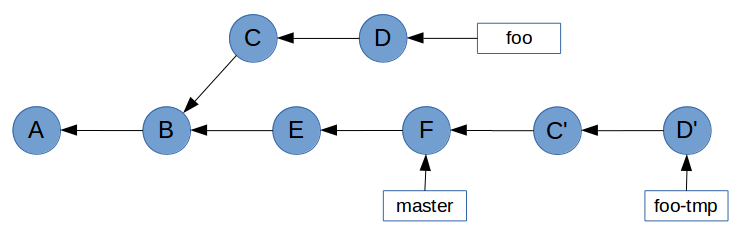
Now all that’s left to do is point foo at commit D’, and delete the temporary branch foo-tmp. We do this with the reset command, which points HEAD (and therefore the current branch) at a specified commit. The --hard flag ensures our working tree is updated as well.
$ git checkout foo
$ git reset --hard foo-tmp
$ git branch -D foo-tmp
This gives the desired result of foo’s commits being upstream of master. Note that the original C and D commits are no longer reachable because no branch points to them.

Rebasing (Continued)
While the example in Cherry-Picking worked, it’s not practical. In Git, rebasing allows us to replace our verbose cherry-pick workflow…
$ git checkout master
$ git checkout -b foo-tmp
$ git cherry-pick C D
$ git checkout foo
$ git reset --hard foo-tmp
$ git branch -D foo-tmp
…With a single command.
$ git rebase master foo
With the format git rebase <base> <target>, the rebase command will take all of the commits from <target> and play them on top of <base> one by one. It does this without actually modifying <base>, so the end result is a linear history in which <base> can be fast-forwarded to <target>.
In a sense, performing a rebase is like telling Git, “Hey, I want to pretend that <target> was actually branched from <base>. Take all of the commits from <target>, and pretend that they happened after <base>“.
Let’s take a look again at the example graph from Merging to see how rebasing can prevent us from having to do a non-fast-forward merge.
All we have to do to enable a fast-forward merge of feature-branch into master is run git rebase master feature-branch before performing the merge.
$ git rebase master feature-branch
First, rewinding head to replay your work on top of it...
Applying: Finished the new feature
This has brought feature-branch directly upstream of master.
Git is now able to perform a fast-forward merge.
$ git checkout master
$ git merge feature-branch
Updating 40837f1..2a534dd
Fast-forward
 feature.html | 1 +
 1 file changed, 1 insertion(+)
Remotes
In order to collaborate on any Git project, you need to utilise at least one remote repository. Unlike centralised VCS which require a dedicated server daemon, a Git remote is simply another Git repository. In order to demonstrate this, we first need to understand the concept of a bare repository.
Recall that Git stores the entire repository inside the .git directory. Inside this directory are blobs and tree objects which can be traversed to build a snapshot of the entire project. This means that Git doesn’t actually need a working tree – it only uses the working tree to figure out what changes have been made since the last commit. This is easily demonstrated if you delete a file from a repository, and then run git checkout <file>. Despite being removed from the file system, Git can still restore the file because it has previously stored it in the repository. You can do the same thing with entire directories and Git will still be able to restore everything by traversing its tree objects.
It is therefore possible to have a repository which can store your project’s history without actually having a working tree. This is called a bare repository. Bare repositories are most commonly used as a “central” repository where collaborators can share changes. The mechanism for sharing these changes will be explained in detail in the Pushing and Pulling sections. For now, let’s look at creating a bare repository.
$ git init --bare
Initialised empty Git repository in /home/demo/bare-repo/
$ ls -l
total 12
drwxrwxr-x 1 demo demo   0 May 31 12:58 branches
-rw-rw-r-- 1 demo demo  66 May 31 12:58 config
-rw-rw-r-- 1 demo demo  73 May 31 12:58 description
-rw-rw-r-- 1 demo demo  23 May 31 12:58 HEAD
drwxrwxr-x 1 demo demo 328 May 31 12:58 hooks
drwxrwxr-x 1 demo demo  14 May 31 12:58 info
drwxrwxr-x 1 demo demo  16 May 31 12:58 objects
drwxrwxr-x 1 demo demo  18 May 31 12:58 refs
Notice how rather than creating a .git directory for the repository, git init --bare simply treats the current directory as the .git directory.
There’s really not much to this repository. The only interesting things it contains are a HEAD reference which points to the master branch (which doesn’t exist yet), and a config file which has the bare flag set to true. The other files aren’t of much interest to us.
$ find . -type f
./info/exclude
./hooks/commit-msg.sample
./hooks/pre-commit.sample
./hooks/pre-push.sample
./hooks/pre-rebase.sample
./hooks/pre-applypatch.sample
./hooks/applypatch-msg.sample
./hooks/post-update.sample
./hooks/prepare-commit-msg.sample
./hooks/update.sample
./description
./HEAD
./config

$ cat HEAD
ref: refs/heads/master
$ cat config
[core]
    repositoryformatversion = 0
    filemode = true
    bare = true
So what can we do with this repository? Well, nothing much right now. Git won’t let us modify the repository because it doesn’t have a working tree to modify. (Note: this isn’t strictly true. We could painstakingly use Git’s low-level commands to manually create and store objects in Git’s data store, but that is beyond the scope of this guide. If you’re really interested, read Git Internals - Git Objects).
$ touch README
$ git add README
fatal: This operation must be run in a work tree
The intended use of this repository is for other collaborators to clone and pull changes from, as well as push their own changes to.
Cloning
Now that we’ve set up a bare repository, let’s look at the concept of cloning a repository.
The git clone command is really just a shortcut which does a few things for you. With its default configuration, it will:
- Create remote-tracking branches for each branch in the remote.
- Check out the branch which is currently active (
HEAD) on the remote. - Perform a
git pullto bring the current branch and working tree up-to-date with the remote.
The clone command takes a URL and supports a number of transport protocols including HTTP, SSH, and Git’s own protocol. It also supports plain old file paths, which is what we’ll use.
$ cd ..
$ git clone bare-repo/ clone-of-bare-repo
Cloning into 'clone-of-bare-repo'...
warning: You appear to have cloned an empty repository.
done.
Let’s inspect this cloned repository to see how Git has set it up.
$ cd clone-of-bare-repo/
$ find . -type f
./.git/info/exclude
./.git/hooks/commit-msg.sample
./.git/hooks/pre-commit.sample
./.git/hooks/pre-push.sample
./.git/hooks/pre-rebase.sample
./.git/hooks/pre-applypatch.sample
./.git/hooks/applypatch-msg.sample
./.git/hooks/post-update.sample
./.git/hooks/prepare-commit-msg.sample
./.git/hooks/update.sample
./.git/description
./.git/HEAD
./.git/config

$ cat .git/HEAD
ref: refs/heads/master
$ ls -l .git/refs/heads/
total 0
$ cat .git/config
[core]
    repositoryformatversion = 0
    filemode = true
    bare = false
    logallrefupdates = true
[remote "origin"]
    url = /home/demo/bare-repo/
    fetch = +refs/heads/*:refs/remotes/origin/*
[branch "master"]
    remote = origin
    merge = refs/heads/master
This is quite literally a clone of bare-repo. The only difference is that this repository contains a few extra lines in .git/config.
First, it contains a remote listing for “origin”, which is the default name given to a repository’s main remote. This tells Git the URL of the repository, and which references it should retrieve when performing a git fetch.
Below that is a branch listing. This is the configuration for a remote-tracking branch. But before we get into that, let’s store some data in the remote repository.
Pushing
We’ve just cloned a completely empty repository, and we want to start working on it.
$ echo 'Project v1.0' > README
$ git add README
$ git commit -m "Add readme"
[master (root-commit) 5d591d5] Add readme
 1 file changed, 1 insertion(+)
 create mode 100644 README
Notice that even though it didn’t technically exist (there was nothing in .git/refs/heads), this commit has been made to the master branch. That’s because the HEAD of this repository pointed to master, so Git has gone ahead and created the branch for us.
$ cat .git/refs/heads/master
5d591d5fafd538610291f45bec470d1b4e77891e
Now that we’ve completed some work, we need to share this with our collaborators who have also cloned this repository. Git makes this really easy.
$ git push origin master
Counting objects: 3, done.
Writing objects: 100% (3/3), 231 bytes | 0 bytes/s, done.
Total 3 (delta 0), reused 0 (delta 0)
To /home/demo/bare-repo/
 * [new branch] master -> master
Notice how we specified both the remote (origin) and the branch (master) that we want Git to push. It is possible to simply run git push, but this can be dangerous and is generally advised against. Running git push without any arguments can (depending on your configuration) push all remote-tracking branches. This is usually okay, but it can result in you pushing changes which you don’t want collaborators to pull. In the worst case, you can destroy other collaborators’ changes if you specify the --force flag.
So, let’s take a look at the remote repository to see what happened.
$ cd ../bare-repo/
$ cat refs/heads/master
5d591d5fafd538610291f45bec470d1b4e77891e

$ git show 5d591d5
commit 5d591d5fafd538610291f45bec470d1b4e77891e
Author: Joseph Wynn <joseph@wildlyinaccurate.com>
Date: Sat May 31 14:08:34 2014 +0100

 Add readme

diff --git a/README b/README
new file mode 100644
index 0000000..5cecdfb
--- /dev/null
+++ b/README
@@ -0,0 +1 @@
+Project v1.0
As we expected, the remote repository now contains a master branch which points to the commit that we just created.
Essentially what happened when we ran git push, is Git updated the remote’s references, and sent it any objects required to build those references. In this case, git push updated the remote’s master to point at 5d591d5, and sent it the 5d591d5 commit object as well as any tree and blob objects related to that commit.
Remote-Tracking Branches
As we saw in Cloning, a remote-tracking branch is essentially just a few lines in .git/config. Let’s take a look at those lines again.
[branch "master"]
    remote = origin
    merge = refs/heads/master
The line [branch "master"] denotes that the following configuration applies to the local master branch.
The rest of the configuration specifies that when this remote-tracking branch is fetched, Git should fetch the master branch from the origin remote.
Besides storing this configuration, Git also stores a local copy of the remote branch. This is simply stored as a reference in .git/refs/remotes/<remote>/<branch>. We’ll see more about how this works in Fetching.
Fetching
The git fetch command is fairly simple. It takes the name of a remote (unless used with the --all flag, which fetches all remotes), and retrieves any new references and all objects necessary to complete them.
Recall what a remote’s configuration looks like.
[remote "origin"]
    url = /home/demo/bare-repo/
    fetch = +refs/heads/*:refs/remotes/origin/*
The fetch parameter here specifies a mapping of <remote-refs>:<local-refs>. The example above simply states that the references found in origin’s refs/heads/* should be stored locally in refs/remotes/origin/*. We can see this in the repository that we cloned earlier.
$ ls -l .git/refs/remotes/origin/
total 4
-rw-rw-r-- 1 demo demo 41 May 31 14:12 master
Let’s see a fetch in action to get a better idea of what happens. First, we’ll create a new branch on the remote repository.
$ cd ../bare-repo/
$ git branch feature-branch
Now we’ll run git fetch from the clone.
$ cd ../clone-of-bare-repo/
$ git fetch origin
From /home/demo/bare-repo
 * [new branch] feature-branch -> origin/feature-branch
This has done a couple of things. First, it has created a reference for the remote branch in .git/refs/remotes/origin.
$ cat .git/refs/remotes/origin/feature-branch
5d591d5fafd538610291f45bec470d1b4e77891e
It has also updated a special file, .git/FETCH_HEAD with some important information. We’ll talk about this file in more detail soon.
$ cat .git/FETCH_HEAD
5d591d5fafd538610291f45bec470d1b4e77891e branch 'master' of /home/demo/bare-repo
5d591d5fafd538610291f45bec470d1b4e77891e not-for-merge branch 'feature-branch' of /home/demo/bare-repo
What is hasn’t done is created a local branch. This is because Git understands that even though the remote has a feature-branch, you might not want it in your local repository.
But what if we do want a local branch which tracks the remote feature-branch? Git makes this easy. If we run git checkout feature-branch, rather than failing because no local feature-branch exists, Git will see that there is a remote feature-branch available and create a local branch for us.
$ git checkout feature-branch

Branch feature-branch set up to track remote branch feature-branch from origin.
Switched to a new branch 'feature-branch'
Git has done a couple of things for us here. First, it has created a local feature-branch reference which points to the same commit as the remote feature-branch.
$ cat .git/refs/remotes/origin/feature-branch
5d591d5fafd538610291f45bec470d1b4e77891e
$ cat .git/refs/heads/feature-branch
5d591d5fafd538610291f45bec470d1b4e77891e
It has also created a remote-tracking branch entry in .git/config.
$ cat .git/config
[core]
    repositoryformatversion = 0
    filemode = true
    bare = false
    logallrefupdates = true
[remote "origin"]
    url = /home/demo/bare-repo/
    fetch = +refs/heads/*:refs/remotes/origin/*
[branch "master"]
    remote = origin
    merge = refs/heads/master
[branch "feature-branch"]
    remote = origin
    merge = refs/heads/feature-branch
Pulling
The git pull command is, like git clone, a nice shortcut which essentially just runs a few lower-level commands. In short, with the format git pull <remote> <branch>, the git pull command does the following:
- Runs
git fetch <remote>. - Reads
.git/FETCH_HEADto figure out if<branch>has a remote-tracking branch which should be merged. - Runs
git mergeif required, otherwise quits with an appropriate message.
At this point, it helps to understand Git’s FETCH_HEAD. Every time you run git fetch, Git stores information about the fetched branches in .git/FETCH_HEAD. This is referred to as a short-lived reference, because by default Git will override the contents of FETCH_HEAD every time you run git fetch.
Let’s introduce some new commits to our remote repository so that we can see this in practice.
$ git clone bare-repo/ new-clone-of-bare-repo
Cloning into 'new-clone-of-bare-repo'...
done.

$ cd new-clone-of-bare-repo/
$ git checkout feature-branch
Branch feature-branch set up to track remote branch feature-branch from origin.
Switched to a new branch 'feature-branch'

$ echo 'Some more information.' >> README
$ git commit -am "Add more information to readme"
[feature-branch 7cd83c2] Add more information to readme
 1 file changed, 1 insertion(+)
$ git push origin feature-branch
Counting objects: 5, done.
Writing objects: 100% (3/3), 298 bytes | 0 bytes/s, done.
Total 3 (delta 0), reused 0 (delta 0)
To /home/demo/bare-repo/
   5d591d5..7cd83c2  feature-branch -> feature-branch
Now, using the steps outlined earlier, let’s manually perform a git pull on the other clone to pull in the changes we just introduced.
$ cd ../clone-of-bare-repo/
$ git fetch origin
remote: Counting objects: 5, done.
remote: Total 3 (delta 0), reused 0 (delta 0)
Unpacking objects: 100% (3/3), done.
From /home/demo/bare-repo
   5d591d5..7cd83c2  feature-branch -> origin/feature-branch
$ cat .git/FETCH_HEAD
7cd83c29d7360dfc432d556fdbf03eb83ec5158d        branch 'feature-branch' of /home/demo/bare-repo
5d591d5fafd538610291f45bec470d1b4e77891e    not-for-merge   branch 'master' of /home/demo/bare-repo
At this point, Git has updated our local copy of the remote branch, and updated the information in FETCH_HEAD.
$ cat .git/refs/heads/feature-branch
5d591d5fafd538610291f45bec470d1b4e77891e
$ cat .git/refs/remotes/origin/feature-branch
7cd83c29d7360dfc432d556fdbf03eb83ec5158d
We know from FETCH_HEAD that the fetch introduced some changes to feature-branch. So all that’s left to do to complete the “pull” is perform a merge.
$ git merge FETCH_HEAD
Updating 5d591d5..7cd83c2
Fast-forward
 README | 1 +
 1 file changed, 1 insertion(+)
And that’s it – we’ve just performed a git pull without actually running git pull. Of course, it is much easier to let Git take care of these details. Just to be sure that the outcome is the same, we can run git pull as well.
$ git reset --hard HEAD^1
HEAD is now at 5d591d5 Add readme
$ git pull origin feature-branch
From /home/demo/bare-repo
 * branch            feature-branch -> FETCH_HEAD
Updating 5d591d5..7cd83c2
Fast-forward
 README | 1 +
 1 file changed, 1 insertion(+)
Toolkit
With a solid understanding of Git’s inner workings, some of the more advanced Git tools start to make more sense.
git-reflog
Whenever you make a change in Git that affects the tip of a branch, Git records information about that change in what’s called the reflog. Usually you shouldn’t need to look at these logs, but sometimes they can come in very handy.
Let’s say you have a repository with a few commits.
$ git log --oneline
d6f2a84 Add empty LICENSE file
51c4b49 Add some actual content to readme
3413f46 Add TODO note to readme
322c826 Add empty readme
You decide, for some reason, to perform a destructive action on your master branch.
$ git reset --hard 3413f46
HEAD is now at 3413f46 Add TODO note to readme
Since performing this action, you’ve realised that you lost some commits and you have no idea what their hashes were. You never pushed the changes; they were only in your local repository. git log is no help, since the commits are no longer reachable from HEAD.
$ git log --oneline
3413f46 Add TODO note to readme
322c826 Add empty readme
This is where git reflog can be useful.
$ git reflog
3413f46 HEAD@{0}: reset: moving to 3413f46
d6f2a84 HEAD@{1}: commit: Add empty LICENSE file
51c4b49 HEAD@{2}: commit: Add some actual content to readme
3413f46 HEAD@{3}: commit: Add TODO note to readme
322c826 HEAD@{4}: commit (initial): Add empty readme
The reflog shows a list of all changes to HEAD in reverse chronological order. The hash in the first column is the value of HEAD after the action on the right was performed. We can see, therefore, that we were at commit d6f2a84 before the destructive change.
How you want to recover commits depends on the situation. In this particular example, we can simply do a git reset --hard d6f2a84 to restore HEAD to its original position. However if we have introduced new commits since the destructive change, we may need to do something like cherry-pick all the commits that were lost.
Note that Git’s reflog is only a record of changes for your local repository. If your local repository becomes corrupt or is deleted, the reflog won’t be of any use (if the repository is deleted the reflog won’t exist at all!)
Depending on the situation, you may find git fsck more suitable for recovering lost commits.
git-fsck
In a way, Git’s object storage works like a primitive file system – objects are like files on a hard drive, and their hashes are the objects’ physical address on the disk. The Git index is exactly like the index of a file system, in that it contains references which point at an object’s physical location.
By this analogy, git fsck is aptly named after fsck (“file system check”). This tool is able to check Git’s database and verify the validity and reachability of every object that it finds.
When a reference (like a branch) is deleted from Git’s index, the object(s) they refer to usually aren’t deleted, even if they are no longer reachable by any other references. Using a simple example, we can see this in practice. Here we have a branch, feature-branch, which points at f71bb43. If we delete feature-branch, the commit will no longer be reachable.
$ git branch
  feature-branch
* master
$ git rev-parse --short feature-branch
f71bb43
$ git branch -D feature-branch
Deleted branch feature-branch (was f71bb43).
At this point, commit f71bb43 still exists in our repository, but there are no references pointing to it. By searching through the database, git fsck is able to find it.
$ git fsck --lost-found
Checking object directories: 100% (256/256), done.
dangling commit f71bb43907bffe0bce2967504341a0ece7a8cb68
For simple cases, git reflog may be preferred. Where git fsck excels over git reflog, though, is when you need to find objects which you never referenced in your local repository (and therefore would not be in your reflog). An example of this is when you delete a remote branch through an interface like GitHub. Assuming the objects haven’t been garbage-collected, you can clone the remote repository and use git fsck to recover the deleted branch.
git-stash
git stash takes all changes to your working tree and index, and “stashes” them away, giving you a clean working tree. You can then retrieve those changes from your stash and re-apply them to the working tree at any time with git stash apply. A common use for the stash command is to save some half-finished changes in order to checkout another branch.
This seems fairly simple at first, but the mechanism behind the stash command is actually quite complex. Let’s build a simple repository to see how it works.
$ git init
Initialised empty Git repository in /home/demo/demo-repo/.git/
$ echo 'Foo' > test.txt
$ git add test.txt
$ git commit -m "Initial commit"
[master (root-commit) 2522332] Initial commit
 1 file changed, 1 insertion(+)
 create mode 100644 test.txt
Now let’s make some changes, and stash them.
$ echo 'Bar' >> test.txt
$ git stash
Saved working directory and index state WIP on master: 2522332 Initial commit
HEAD is now at 2522332 Initial commit
Stashes in Git are put onto a stack, with the most recently-stashed on top. You can list all current stashes with git stash list.
$ git stash list
stash@{0}: WIP on master: 2522332 Initial commit
Right now we only have one stash: stash@{0}. This is actually a reference, which we can inspect.
$ git show stash@{0}
commit f949b46a417a4f1595a9d12773c89cce4454a958
Merge: 2522332 1fbe1cc
Author: Joseph Wynn <joseph@wildlyinaccurate.com>
Date:   Sat Jul 5 00:15:51 2014 +0100

    WIP on master: 2522332 Initial commit

diff --cc test.txt
index bc56c4d,bc56c4d..3b71d5b
--- a/test.txt
+++ b/test.txt
@@@ -1,1 -1,1 +1,2 @@@
  Foo
++Bar
From this we can see that the stash is pointing to a commit object. What’s interesting is that the stash commit is a merge commit. We’ll look into that in a bit, but first: where is this commit?
$ git log --oneline
2522332 Initial commit

$ git branch
* master

$ git fsck --lost-found
Checking object directories: 100% (256/256), done.
It’s not in the current branch, and there are no other branches it could be in. git-fsck hasn’t found any dangling commits, so it must be referenced somewhere. But where?
The answer is simple: Git creates a special reference for the stash which isn’t seen by commands like git branch and git tag. This reference lives in .git/refs/stash. We can verify this with git show-ref.
$ git show-ref
25223321ec2fbcb718b7fbf99485f1cb4d2f2042 refs/heads/master
f949b46a417a4f1595a9d12773c89cce4454a958 refs/stash
So why does Git create a merge commit for a stash? The answer is relatively simple: as well as recording the state of the working tree, git stash also records the state of the index (also known as the “staging area”). Since it’s possible for the index and the working tree to contain changes to the same file, Git needs to store the states separately.
This gives us a history that looks a little like this:

In this history graph, the tree of commit C contains the changes to the working tree. Commit C’s first parent is the commit that HEAD pointed to when the stash was created (commit A). The second parent (commit B) contains the changes to the index. It is with these two commits that Git is able to re-apply your stashed changes.
git-describe
Git’s describe command is summed up pretty neatly in the documentation:
git-describe - Show the most recent tag that is reachable from a commit
This can be helpful for things like build and release scripts, as well as figuring out which version a change was introduced in.
git describe will take any reference or commit hash, and return the name of the most recent tag. If the tag points at the commit you gave it, git describe will return only the tag name. Otherwise, it will suffix the tag name with some information including the number of commits since the tag and an abbreviation of the commit hash.
$ git describe v1.2.15
v1.2.15
$ git describe 2db66f
v1.2.15-80-g2db66f5
If you want to ensure that only the tag name is returned, you can force Git to remove the suffix by passing --abbrev=0.
$ git describe --abbrev=0 2db66f
v1.2.15
git-rev-parse
git rev-parse is an ancillary plumbing command which takes a wide range of inputs and returns one or more commit hashes. The most common use case is figuring out which commit a tag or branch points to.
$ git rev-parse v1.2.15
2a46f5e2fbe83ccb47a1cd42b81f815f2f36ee9d
$ git rev-parse --short v1.2.15
2a46f5e
git-bisect
git bisect is an indispensable tool when you need to figure out which commit introduced a breaking change. The bisect command does a binary search through your commit history to help you find the breaking change as quickly as possible. To get started, simply run git bisect start, and tell Git that the commit you’re currently on is broken with git bisect bad. Then, you can give Git a commit that you know is working with git bisect good <commit>.
$ git bisect start
$ git bisect bad
$ git bisect good v1.2.15
Bisecting: 41 revisions left to test after this (roughly 5 steps)
[b87713687ecaa7a873eeb3b83952ebf95afdd853] docs(misc/index): add header; general links
Git will then checkout a commit and ask you to test whether it’s broken or not. If the commit is broken, run git bisect bad. If the commit is fine, run git bisect good. After doing this a few times, Git will be able to pinpoint the commit which first introduced the breaking change.
$ git bisect bad
e145a8df72f309d5fb80eaa6469a6148b532c821 is the first bad commit
Once the bisect is finished (or when you want to abort it), be sure to run git bisect reset to reset HEAD to where it was before the bisect.
Useful commands
Find which commit a reference points at
$ git rev-parse HEAD
0f64e9e759c904553309858070f444e5e64847c4

$ git rev-parse --short HEAD
0f64e9e
Find which branches a commit is in
$ git branch --contains HEAD
  master
* other-branch
Find commits that are in one branch but not another
$ git log --oneline --right-only master...hotfix-1

0f64e9e Apply hotfix patch from #2914 to hotfix-1
bc3bff5 [Cherry-pick] Fix issue #2926
Exclude commits that were cherry-picked
$ git log --oneline --cherry-pick --right-only master...hotfix-1

0f64e9e Apply hotfix patch from #2914 to hotfix-1
View details of an object
$ git cat-file -p HEAD
tree af22d0482b89640c95986f3b4663026bcb7f764b
parent bc3bff555f573ac76f0d3e71f0e54d63f50b8434
author Foo Bar <foo@bar.com> 1436294582 +0100
committer Foo Bar <foo@bar.com> 1436294582 +0100

Lorem ipsum dolor sit amet, consectetur adipiscing elit
Show an object’s type
$ git cat-file -t HEAD
commit
Show an object’s size
$ git cat-file -s HEAD
253
Print the tree of a given reference
$ git ls-tree -t -r HEAD
100644 blob 59e004af21a725c9b378001a1b231967f955b992    .gitignore
100644 blob 9f5d366d261317d8ff881ee2945ef2c7960fa2ea    .travis.yml
100644 blob 148fc67781eba8c08bbb4db1fc9e92b9781ec28d    LICENSE
100644 blob 4a2727bb9afae5782510e7ce764608540dd7c04a    Makefile
100644 blob b07b8d5f39d6f62a18a1b0791f33a784ec34556e    README.md
100644 blob 9a994af677b0dfd41b4e3b76b3e7e604003d64e1    Setup.hs
100644 blob 66820894ca2c16725e8527e16785f2eebd89871a    lishp.cabal
040000 tree eda8357ddb73fa384f283291bac84d7fe1bce436    src
040000 tree 6a84cb52f17c7e1ff691fe45f4c70df5269bdab0    src/Lishp
100644 blob 1f7677ed0c7f3e713c7e6a16d94cc3db89d911cd    src/Lishp/Interpreter.hs
100644 blob 1a0fe9394bc2d7789d783a467626301204de700a    src/Lishp/Primitives.hs
100644 blob caf0fcf1cd265436efbaa6cc39338e653197a3ee    src/Lishp/Readline.hs
100644 blob 92cf693d29169066356bed3f1ae794a624db49a5    src/Lishp/Types.hs
100644 blob 82ec4d14e01598f38a083ab2dea326615cd048dd    src/Main.hs
040000 tree ba0974cba2e671b840bb3cefa69569f62cec29b5    test
100644 blob 2589b7aeb1562a3aa951c2fa52f64891db87d1c6    test/assignment.sh
100644 blob d54fa0437e13ba5ee15ad13330ac07b9a6abcdcc    test/equality.sh
100644 blob ee61aa5dffca43032b5aeef6f4e79ff1f9f2df85    test/functions.sh
100644 blob 22fbec9189d2641c590836c4bb19431d3c6d3df3    test/primitives.sh
100644 blob c455f01b3d88b5d510ff4ebb50e93c5d7f8f0b26    test/types.sh
Find the first tag that contains a reference
$ git describe HEAD
v1.6.1