
This is the first post in a series on JavaScript. In this post I’m going to explain how JavaScript’s prototype chain works, and how you can use it to achieve inheritance.
First, it’s important to understand that while JavaScript is an object-oriented language, it is prototype-based and does not implement a traditional class system. Keep in mind that when I mention a class in this post, I am simply referring to JavaScript objects and the prototype chain – more on this in a bit.
Almost everything in JavaScript is an object, which you can think of as sort of like associative arrays - objects contain named properties which can be accessed with obj.propName or obj['propName']. Each object has an internal property called prototype, which links to another object. The prototype object has a prototype object of its own, and so on – this is referred to as the prototype chain. If you follow an object’s prototype chain, you will eventually reach the core Object prototype whose prototype is null, signalling the end of the chain.
So what is the prototype chain used for? When you request a property which the object does not contain, JavaScript will look down the prototype chain until it either finds the requested property, or until it reaches the end of the chain. This behaviour is what allows us to create “classes”, and implement inheritance.
Don’t worry if this doesn’t make sense yet. To see prototypes in action, let’s take a look at the simplest example of a “class” within JavaScript, which is created with a function object:
function Animal() {}

var animal = new Animal();
We can add properties to the Animal class in two ways: either by setting them as instance properties, or by adding them to the Animal prototype.
function Animal(name) {
// Instance properties can be set on each instance of the class
this.name = name;
}
// Prototype properties are shared across all instances of the class. However, they can still be overwritten on a per-instance basis with the `this` keyword.
Animal.prototype.speak = function() {
console.log("My name is " + this.name);
};
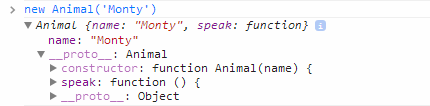
var animal = new Animal('Monty');
animal.speak(); // My name is Monty
The structure of the Animal object becomes clear when we inspect it in the console. We can see that the name property belongs to the object itself, while speak is part of the Animal prototype.
Now let’s look at how we can extend the Animal class to create a Cat class:
function Cat(name) {
    Animal.call(this, name);
}

Cat.prototype = new Animal();

var cat = new Cat('Monty');
cat.speak(); // My name is Monty
What we are doing here is setting Cat’s prototype to an instance of Animal, so that Cat inherits all of Animal's properties. We’re also using Animal.call to inherit the Animal constructor (sort of like parent or super in other languages). call is a special function which lets us call a function and specify the value of this within that function. So when this.name is set inside the Animal constructor, it’s the Cat’s name property being set, not the Animal’s.
Let’s take a look at the Cat object to get a better view of what’s going on.
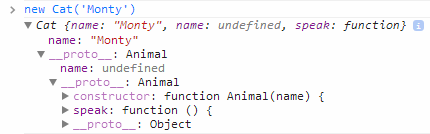
The Cat object has its own name instance property, like we expected. When we look at the object’s prototype we see that it has also inherited Animal’s name instance property as well as the speak prototype property. This is where the prototype chain comes in – when we request cat.name, JavaScript finds the name instance property and doesn’t bother going down the prototype chain. However when we request cat.speak, JavaScript has to travel down the prototype chain until it finds the speak property inherited from Animal.
At this point I would recommend going through a few slides of John Resig’s JavaScript Ninja as they go into more detail about how JavaScript prototypes work, and provide some good interactive examples.